Accurate Displacement Workflow
from: ZBrush / Mudbox
to: V-Ray (Maya, 3ds Max, Cinema 4D) / Arnold (Maya)
v1.4
- April 2015
Changelog
v1.0 - May 01 2013 - Public Release.
v1.1 - May 10 2013 - Added additional info for ZBrush's DPSubPix setting.
v1.2 - July 26 2013 - Fixed a typo in Mudbox's Normalize To Search Distance setting ('Checked' meant to be 'Unchecked').
v1.3 - January 30 2014 - Updated procedure for ZBrush, and added procedure for V-Ray for C4D.
v1.4 - April 20 2015 - Updated procedures to disable displacement map filtering and utilize the VRayHDRI loader for 3ds Max.

Intro
This tutorial attempts to cover and clarify the process of generating and applying accurate displacement maps from either ZBrush or Mudbox, to V-Ray for Maya, V-Ray for 3ds Max, V-Ray for Cinema 4D, or Arnold for Maya (MtoA).
There's often a lot of confusion and misinformation surrounding displacement maps and how they're supposed to work. You'll sometimes see artists load a displacement map onto their low resolution geometry and play with intensity and depth values until it looks somewhat similar to their high resolution geometry and assume that's it's as close as they can get. But with a correct workflow you don't have to fiddle with settings or settle for 'close enough' - it'll just work correctly from the start to match your high resolution geometry as accurately as possible.
We'll first cover some of the underlying concepts behind how a floating-point displacement map works and how to recognize if you're getting correct results. Then we'll cover some of the common pitfalls that artists frequently encounter and how to avoid them. And finally I'll provide the step-by-step procedures to make displacement mapping work accurately in your software of choice.
If you already know the underlying concepts and just want the technical step-by-step procedures, click here to skip right to it.
How Floating-Point Displacement Works
Displacement mapping is a method of taking high resolution geometry information and baking it to an image map that can be applied to low resolution geometry. This map then gets used by your renderer to replicate the high resolution geometry detail as accurately as possible. A properly generated floating-point displacement map will make your low res geometry match your high res geometry very accurately - right from the start.
This is because a correctly generated floating-point displacement map works in a very logical way: The displacement map's pixel values correspond directly to your 3D package's scene units. So a pixel value of 1.0 will displace your mesh by 1.0 scene units. A pixel value of 0.5 displaces your mesh by 0.5 scene units. And a pixel value of 0.0 doesn't displace your mesh at all. All very logical. And because the displacement map's pixel values are stored in floating-point format, they can contain pixel values far above 1.0, and negative pixel values far below 0.0. It's a great way to store precise displacement information.
We can illustrate this using a simple test scene:
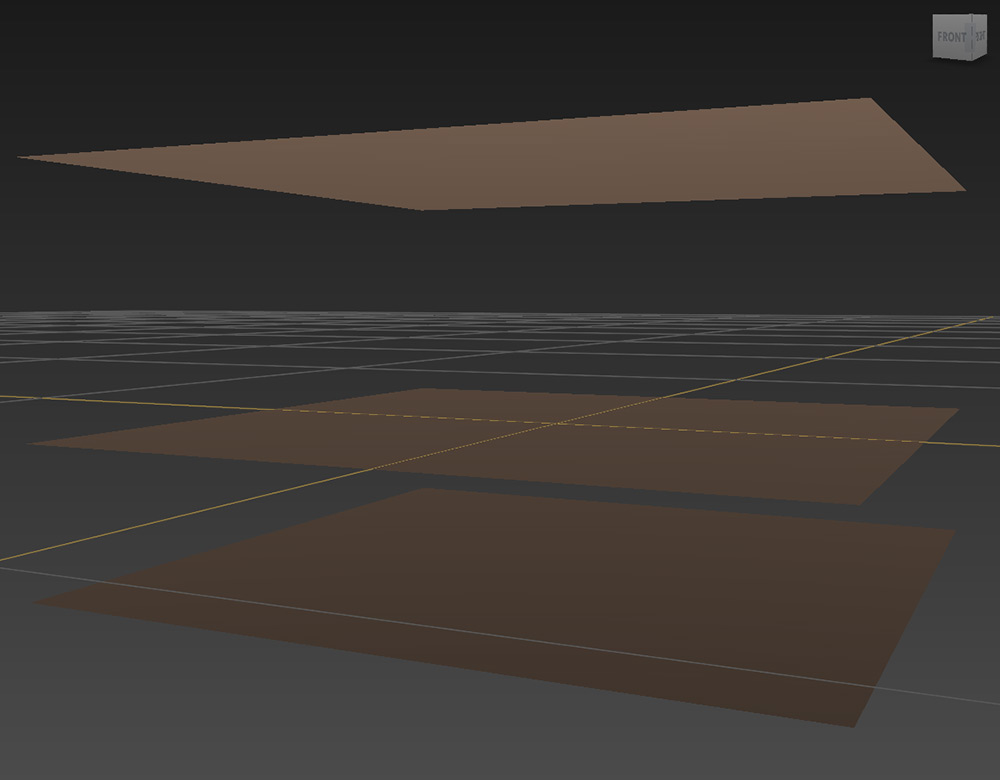
- 3 planes on different locations along the up/down axis, each made of just one polygon, and each with a default planar UV map.
- The top plane is at 35.0 units on the up/down axis.
- The middle plane is at 0.0 units on the up/down axis.
- The bottom plane is at -20.0 units on the up/down axis.

Figure 01
Three identical planes located at different spots on the up/down axis.
Download this test setup in multiple formats if you want to try it yourself.
We'll import the scene into a program like ZBrush or Mudbox, subdivide the middle plane a few times, and do some simple sculpting on it. First we'll pull a point in the center up just enough so it touches the plane above it, and then pull two points down on the sides until they just touch the plane on the bottom. We'll also write something across the surface for some additional detail.
Once we're done, we can go ahead and generate the displacement map for the middle plane (using the procedure listed below). We can now open and inspect the map in a program like Nuke - which works natively with floating-point images.
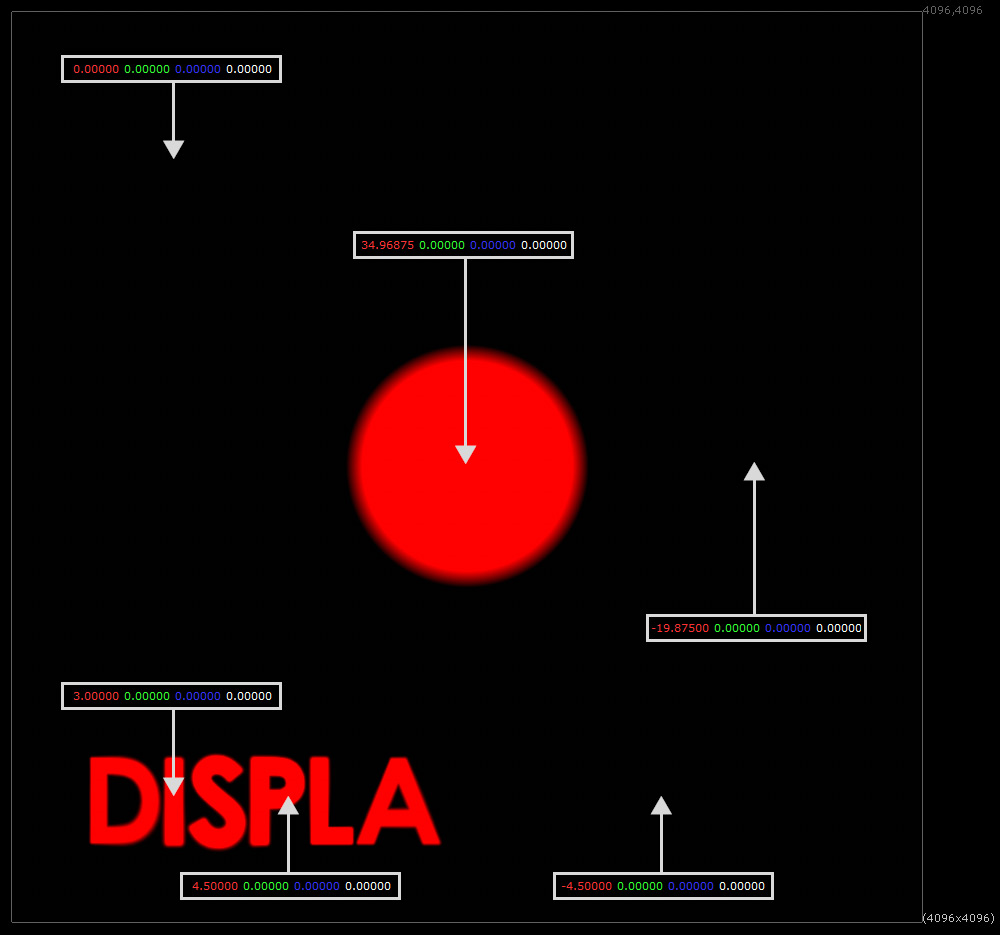
In the Nuke viewer we can test our generated displacement map. When we hover our cursor over the center point of the image - which corresponds to where we pulled up the mesh to touch the top plane - Nuke shows us a pixel value of roughly 35.0, which if you'll recall is exactly where we placed the top plane along the up/down axis. Also when we hover over the general location corresponding to either of the two points we pulled down, we see pixel values of roughly -20.0, also exactly where we placed the bottom plane along the up/down axis.

Figure 03
Hovering over points of the displacement map in the Nuke viewer shows their pixel values. Here the image is red because displacement only needs one channel to store its info - so it's stored in the Red channel. Also the negative pixel values are not directly visible because they are below 0.0 - the black point of our monitors.
While we might not be able to directly SEE much in the displacement map from a raw visual standpoint, the data it contains is certainly there... and that's really all a displacement map is - an image being used to store displacement data.
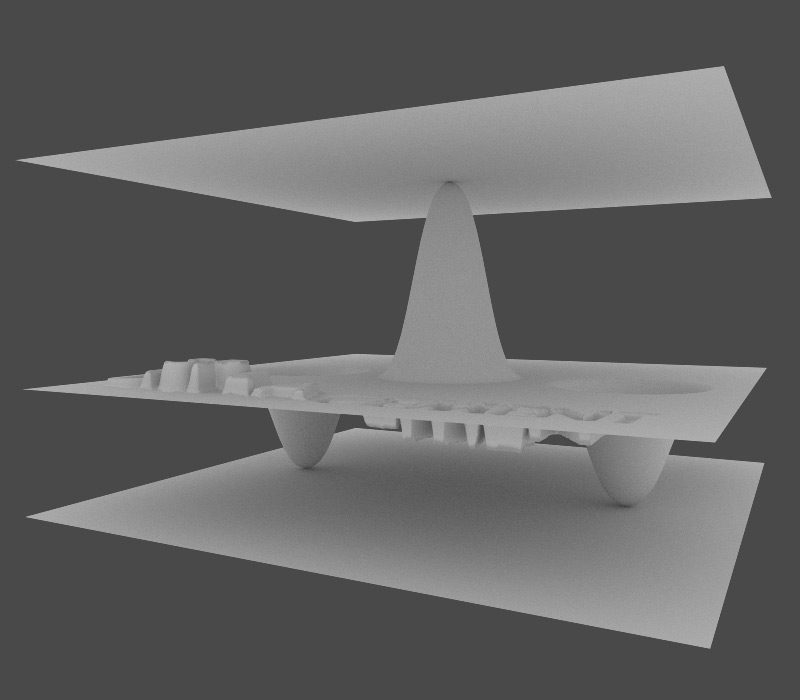
So we can assume that this is a correctly generated displacement map since we know ahead of time how high and low we placed the upper and lower planes along the up/down axis. And sure enough when we apply the displacement map to the middle plane in our 3D software (using the procedure listed below) and hit render, we get the exact same result we had in our sculpting program - the center point just touches the top plane 35.0 units above it, the two points on the side just touch the bottom plane -20.0 units below it, and the rest of the details displace correctly. No 'displacement amount', 'shift', or 'middle point' settings had to be fiddled with - it correctly and accurately displaces the mesh right from the start.

Figure 04
The displacement map applied to the middle plane and rendered - exactly matching what we had in our sculpting program.
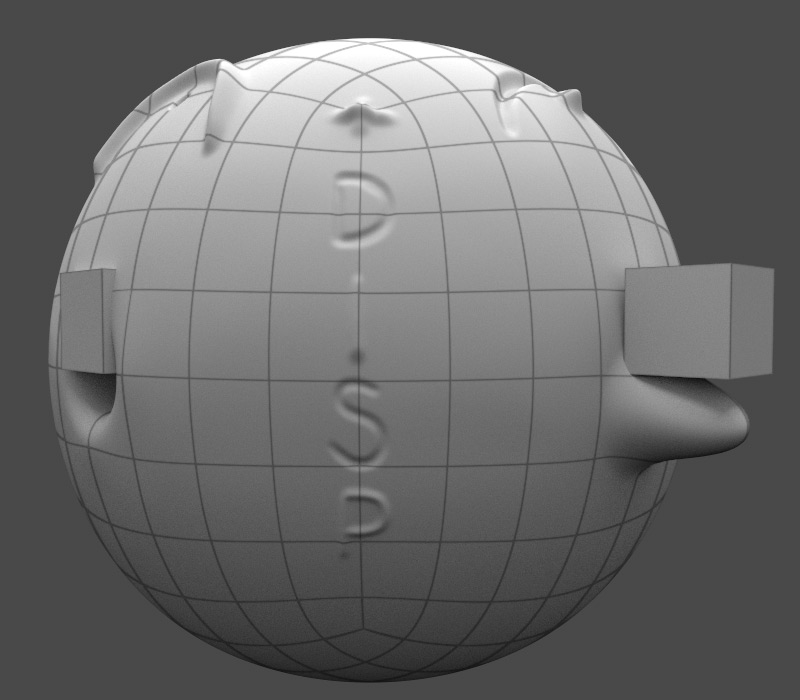
Even though this example uses fairly extreme values (35.0 units up and -20 units down) the results are still accurate. In another example we apply displacement to a more complex object with multiple UV seams and still get correct results - even across the seams. The boxes on the side of the sphere are 5 units wide on all sides, and serve as a visual indicator to confirm correct displacement amounts.

Figure 05
Displacement mapping applied to a more complex object, with displacement occurring over multiple UV seams with no issues.
And finally, below is a example of floating-point displacement mapping in a real world production setting. The detailing you see on the right comes purely from displacement mapping - there are no normal or bump maps involved - and it matches the high resolution geometry of the original sculpt precisely.
Common Pitfalls & Avoiding Them
UVs Are Important
Displacement mapping generally requires a good UV layout of your object. There can be no overlapping UVs as it will cause errors in the generated maps. Also, ZBrush in particular does not like UVs to rest directly on the edges of the UV sheet (as some automatic UV generation methods will do) - so make sure your UVs are always placed slightly within the edges of the UV sheet.
Double Check Your Basemeshes
Remember that while sculpting at higher subdivision levels, the positions of lower subdivision vertices are often also being affected. So the low res mesh you imported into your sculpting program may no longer be exactly the same as the low res mesh you're using to generate your displacement map. Always double check to make sure the low res mesh you generated your displacement map from is the same as the mesh you're applying your displacement map to.
Floating-Point Displacement Maps Are Scale Dependent
Since the pixel values of a floating-point displacement map correspond directly to scene units, your object's scale becomes an important factor for guaranteeing accurate displacement amounts. If you scale your low-res mesh up or down after you've already generated your displacement map, your displacement map will no longer have accurate intensity values relative to the new scale of the basemesh. The map will either have to be regenerated with the new object scale, or compensated for by the 'Displacement Amount' setting in V-Ray, or displacement 'Height' setting in Arnold. For example: if you scaled your object up x2, then you'll have to increase the displacement amount setting x2 to compensate.
Floating-Point -vs- Integer
The procedures listed below cover generating 32bit floating-point displacement maps, but if you're in a production setting that's especially concerned about saving harddrive space, you can also use 16bit floating-point (half-float) and still get practically identical results. However it's important to be sure you use a 16bit floating-point format to store your image, and NOT a 16bit integer format. An integer format will not work correctly in this workflow, and you'll have to do the whole 'displacement amount' and 'shift' song and dance to make them work. This is because integer formats do not support negative pixel values, which are used by floating-point displacement maps to represent carved-in areas. If you're not sure how to get one or the other, stick to the procedures listed below to get 32bit floating-point displacement maps.
There's Only So Much Displacement Can Reliably Do
In an ideal world, floating-point displacement mapping always produces exact, accurate results with absolutely no differences from the original high resolution mesh. Unfortunately 3D software is hardly ideal - and each software package tends to have it's own methods to accomplish similar tasks. Where this can sometimes cause subtle shifts in precision for displacement is the topic of smoothing algorithms. Some software packages use an algorithm like Catmull-Clark to smooth their meshes, and other packages use their own entirely different method. Until the day comes that all software packages can agree to use the same algorithms (like Pixar's OpenSubdiv initiative - email your software companies encouraging them to implement it!) there can be slight changes between your high res mesh to your displaced low res mesh. The good news is these shifts are often subtle and become much less of an issue if your basemesh isn't VERY low polygon. Basically, don't expect displacement to be a magic bullet. If you're trying to turn a simple polygon cube into an apple through displacement mapping only, don't be surprised if you run into issues. Give your low polygon object proper form and polygon resolution, and let displacement carry the details.
Displacement Procedures
So now we know how floating-point displacement maps work and what to expect from them. It's just a matter of pushing the right buttons to correctly generate and apply them in our 3D packages. Below I've laid out step-by-step procedures of how to generate floating-point displacement maps from the major sculpting package of your choice - and apply them in the renderer of your choice.
Each of the settings in the following workflows are the result of careful testing. If you're curious about any of the settings, just click the "(?)" next to a step to view a popup explaining what the setting does and why it's set as it is.
- Open or Import your high-res mesh with multiple subdivision levels.
- If you imported your high res mesh from another program - rebuild the lower subdivisions by going to the Tool palette, expanding the Geometry subpalette, and clicking the 'Reconstruct Subdiv' button until at the lowest desired level.
- In the ZPlugin palette, expand the Multi Map Exporter subpalette, and make sure the Displacement button is highlighted.
- Set the Map Size slider to the image resolution that best suits your needs. (Recommended 2048 or higher)
- Set 'Flip V' to ON.
(?)
Flip V Setting
Setting this to ON compensates for the way ZBrush handles UV maps internally - which is flipped along the vertical axis compared to programs like Maya and Max.
- Click the 'Export Options' button to reveal additional map options.
- Set the 'SubDiv Level' slider to the subdiv level you want your low resolution basemesh to be.
- Set 'Adaptive' to OFF.
(?)
Adaptive Setting
Setting this to ON is supposed to produce a higher-quality displacement map.
But through experimentation I have found it to be unreliable and generally unnecessary at larger resolutions.
At times it can even result in a displacement map that is completely useless - So I recommend leaving it OFF. - Set 'DPSubPix' to '4'.
(?)
DPSubPix Setting
This setting determines the accuracy of the displacement map created for the object.
Higher values cause a higher-quality displacement map to be generated, but will take longer to generate.
If your high resolution mesh is very high poly (16mil or larger), or your displacement map size low (2048 or lower), then you can get away with setting this to a lower value like 2. - Set 'SmoothUV' to OFF.
(?)
SmoothUV Setting
Setting this to OFF disables UV Smoothing on our low res mesh.
We'll match this setting in our renderer to ensure an accurate mapping of displacement details. - Set 'Mid' to '0'.
(?)
Mid Setting
Setting this to 0 makes the displacement map pixel value of 0.0 act as the mid point where no displacement is being applied - which is what we want for an accurate floating-point displacement map.
- Set '3 Channels' to OFF.
(?)
3 Channels Setting
Setting this to OFF stores our displacement information using only the RED channel of our generated displacement map.
32bit Displacement only needs one channel to store its info, so this setting will slightly reduce file sizes without losing any info. - Set '32 Bit' and 'EXR' to ON.
(?)
32Bit Setting
Setting this to ON enables the export of a 32bit floating-point displacement map.
- Set 'Scale' to '1'.
(?)
Scale Setting
This setting determines the scale of the generated displacement map's pixel values.
Since we want an exact 1:1 match, we'll leave this at a default value of 1. - Here is a screengrab of the above settings to verify.
- Click the 'Create All Maps' button, choose a filename and directory to save your map to. (Don't worry if the filetype says TIF, since we enabled the EXR button it will in fact be saving in EXR format)
- Click the 'Save' button to run the displacement map generation.
- Your displacement map is now ready for use!
A note about ZBrush and the Multimap Exporter Plugin:
In versions prior to ZBrush 4R6, the Multimap Exporter Plugin only allowed for export in 32bit TIFF format - which Maya and 3ds Max can have issues with. So if you use the Multimap Exporter plugin in versions prior to 4R6, you'll probably have to convert your generated 32bit TIFF to EXR in Nuke or Photoshop before using them in Maya or 3ds Max. If converting to EXR in Photoshop, be sure the image mode (Image menu -> Mode) is set to RGB Color and NOT Grayscale, as this can also cause problems.
- Import your low-res mesh (Double check that your low-res mesh is the exact same mesh you generated your displacement map from).
- Select your mesh, open the attribute editor, and have your object's Shape node tab selected. Then in the attribute editor's menu click 'Attributes -> V-Ray' and check 'Subdivision', 'Subdivision and Displacement Quality' and 'Displacement Control' to add those extra attributes to your mesh's Shape node.
- Scroll to the bottom of the attribute editor and expand the 'Extra V-Ray Attributes' rollout.
- Set 'Render As A Subdivision Surface' to CHECKED.
(?)
Render As A Subdivision Setting
Setting this to CHECKED will turn our low res mesh into a smooth subdivision surface before applying the displacement map.
This matches the way ZBrush and Mudbox were setup to generate the displacement map. - Set 'Subdivide UVs' to UNCHECKED.
(?)
Subdivide UVs Setting
Setting this to UNCHECKED disables UV Smoothing on our low res mesh.
This matches the way ZBrush and Mudbox were setup to generate the displacement map. - Set 'Edge Length' to a value of 4.0 to begin with, and lower as needed for better displacement quality (at the expense of higher render times).
- Select 'Normal Displacement' from the Displacement Type dropdown.
(?)
Normal Displacement Setting
While Normal Displacement is generally the best all-around setting for displacement mapping type, you may be able to get even higher quality results with 2D Mapping.
As long as your UVs are good, you can experiment with both displacement types to see which gives the best results. - Set 'Keep Continuity' to CHECKED.
(?)
Keep Continuity Setting
Setting this to CHECKED will have V-Ray keep displaced face edges connected without splits.
- Uncheck 'Filter Texture' to disable filtering of your displacement map and preserve the high frequency details of your sculpt.
- Leave all other settings at their defaults. Here is a screengrab of the above settings to verify.
- Open Hypershade, create a VRayMtl and assign it to your mesh.
- In the Shading Groups tab in Hypershade, select your newly created VRayMtlSG and hold right click to select 'Graph Network' to see your object and VRayMtl nodes in the work area of the Hypergraph.
- Add a 'Displacement' node to the work area from maya's list of hypershade nodes on the left, then middle-click-drag from the Displacement node to the VRayMtlSG node and then select 'Default'.
- Add a 'File' node to the work area from maya's list of hypershade nodes on the left, the middle-click-drag from the File node to the Displacement node and then select 'Other...'
- On the left side of the connection editor, click the plus next to 'OutColor' to expand it and select 'OutColorR', then select the 'Displacement' value on the right side to connect them.
(?)
OutColorR to Displacement Setting
We have both ZBrush and Mudbox set to store the generated displacement map's information to the RED channel only.
So having OutColorR connected to the displacement amount is logicial and avoids Maya's tendency to average the RED, GREEN, and BLUE channels together -
Which would result in a displacement intensity 1/3 what it should be (since the other channels are just black). - Select the 'File' node in hypergraph, open the attribute editor, and load in your previously generated displacement map in the 'Image Name' box.
- In the attribute editor's menu click 'Attributes -> V-Ray' and check 'Texture Input Gamma' and 'Allow Negative Colors' to add those extra attributes to your File node.
- Scroll to the bottom of the attribute editor, open the 'V-Ray Extra Attributes' rollout, and change color space to 'Linear' and check 'Allow Negative Colors'.
- Open the Maya Render Settings window, go to the 'V-Ray' tab, and open the 'Global Options' rollout. Make sure that the checkbox next to 'Displacement' is checked.
- You're all setup! Render to verify.
Conclusion
Hopefully that helps clear up the often confusing topic of Displacement Mapping for you. It's an incredibly important tool to help keep your high resolution assets lean and production friendly.
Special thanks to:
Rich Nosworth for generously providing the procedure for VRay for C4D.
Scott Denton for helping to test the above procedures.
Donate
Have you found this tutorial helpful?
If so, consider chipping in whatever you feel it's worth so I can dedicate more time to creating free high quality content to share with the CG community.
Thanks! I really appreciate the support!


